Sunday, September 29, 2013

Recipe: Hu Tieu Sa Te aka Satay Noodle Soup with Beef


Next to pho, this has got to be my ultimate favorite beef noodle soup.  The satay consistency and flavors lend this noodle soup a more stew-like feel than pho with its clear broth.  My mom introduced me to this noodle soup later in my childhood, and I still joke with her that I feel cheated for the earlier years.  I believe this is of Chinese origins, but don't quote me on that.  My mom, however, DID get the recipe from a Chinese friend so...maybe!  If anybody knows, do share your information, please!  

Special Equipment
4 quart stock pot

Broth Ingredients
3 quarts of shrimp stock
2 tbsp hoisin sauce
1 tsp oyster sauce
3 tbsp crunchy peanut butter
2 heaping tsp of Lee Kum Kee's Satay Sauce

1. Warm the shrimp stock.

2. Add the hoisin sauce, oyster sauce, crunchy peanut butter, chili oil, and satay sauce to the shrimp stock and thoroughly mix.  

Assembly (simmer broth while you are assembling the bowls)
sliced rib eye
cooked tendon
fresh hu tieu noodles or extra large pho noodles
tomato slices
cucumber, cut into matchsticks
fried shallots to garnish
Tia to (red perilla leaves)
Hung lui (mint leaves)
Hung que (Thai basil)
bean sprouts
lime wedges
Sriracha hot sauce

1. If using fresh hu tieu noodles, separate the noodles after you remove them from packaging.  Fair warning: this will be an oily mess!  If using dry extra large pho noodles, bring a pot of water to boil.  Put pho noodles in using a strainer, swirling noodles the entire time to prevent the noodles from clinging to each other.  Taste test the noodles to determine doneness.  They should be done after about 8-10 minutes.  Make sure the noodles are drained of excess water before placing them into the serving bowl(s).

2. Quickly dip the sliced rib eye into the hot sa te broth to flash cook the meat.  Remove and top the noodles with the flash cooked rib eye and tendon.

3. Arrange the sliced tomatoes and cucumber matchsticks on top of the noodles.  

4. Increase the heat of the broth to bring it to a rolling boil.  Ladle broth into each bowl.

5. Garnish with tia to, hung lui, hung que, bean sprouts, and fried shallots.  Squeeze as much lime as desired.  Add as much Sriracha hot sauce as you can handle.  

Cook's note: I realize my picture does not include cucumber, but that's my personal preference when eating this noodle soup. 

Bon appetit!

Tuesday, September 24, 2013

First Impression: Urban Decay Naked Skin

Image source: Rank & Style


Advertised as a weightless ultra definition foundation, Urban Decay's Naked Skin Foundation is available in 18 shades designated by a number system.  Shades ending in ".0" are for those with warmer skin tones, and shades ending in ".5" are for those with cooler skin tones.  The packaging is a sleek glass pump bottle that reminds me of the YSL Touche Eclat Foundation.

Not only is this foundation formulated without: parabens, sulfates, synthetic fragrances, phthalates, GMOs, and triclosan, but it boasts of a list of nourishing ingredients: Matrixyl 3000 (anti-wrinkle peptide), Litchiderm, green tea, Vitamin E, and sodium hyaluronate.  More pluses: vegan and cruelty free.

This foundation is more liquid-y than any foundation I've used.  Before applying, it is recommended to shake the bottle to allow the mixing balls inside to thoroughly mix the formula.  The foundation blended beautifully with my Real Techniques buffing brush.  A little goes a long way - I dabbed my brush into a little less than a quarter size diameter of product and it was enough coverage for my entire face, ears, and neck.  Although advertised as a light coverage foundation, it is buildable to medium coverage.

As far as the finish, this foundation is advertised to give a luminous and demi-matte finish.  Be warned, however, that it takes about 15 minutes to completely dry.  It felt very dewy when I finished applying and buffed out the foundation.  Initially I thought the advertisement of a demi-matte finish was erroneous.  However, once the foundation set and completely dried on my skin, it did, in fact, give a demi-matte / satin finish.  True to its word, the foundation felt weightless and did not leave a heavy feeling on my face throughout the day.

How is this foundation's longevity?  It provided coverage for a solid 6 hours.  After 6 hours, my t-zone needed retouching.

Would I wear this foundation to a special event? Yes - it has no SPF, which translates to no flashback in photos.  However, I'd layer a sunscreen underneath this foundation during the daytime for protection.

Verdict: Tres bon first impression!

Monday, September 16, 2013

Review: Origin's Clear Improvement Active Charcoal Mask


Formulated with active charcoal, this mask promises, by virtue of that same active charcoal, to vacuum out pores to de-clog them.  White China absorbs environmental toxins, and lecithin dissolves impurities.

The mask itself is a dark grey color with a smooth consistency that takes on on a gel like cream.  Formulated without parabens, sulfates, synthetic fragrances, synthetic dyes, petrochemicals, phthalates, GMOs, and triclosan, this product is good for all skin types and is one of Origins' top sellers.

To use this product, place a warm towel onto your face.  This assists with opening the pores in order to allow the mask to vacuum out dirt and toxins most effectively.  Apply the mask to your face and rinse off after 10 minutes.  

My face felt very clean after I rinsed the mask off my face.  I took particular notice of the fact that the area around my nose felt much smoother, which is indicative that my pores were de-clogged.  However, I had small bumps on my chin that did not go away, and a closer inspection of my nose showed that blackheads were still present.  In terms of hydration, my skin felt a bit on the tight side.  I have normal to combination skin so the fact that my skin was left a bit tight from the mask indicates that this product is a bit drying.  Josie Maran's argan oil instantly fixed this.

The product is affordable at $24 for 3.4 fl oz. 

Truth be told, I've been looking for a more affordable alternative but equally as effective to GlamGlow's Super Mud.  If you recall in this POST, I was absolutely in love with Super Mud after but one use.  At about $70 for 1.2 oz, however, my wallet is advising me to seek a mistress.  I cannot help but remember how effective GlamGlow's charcoal mask was even after a night's sleep - my skin continued to feel smooth and soft like a baby's bum the morning after.  This is in contrast with Origins' mask.  Moreover, GlamGlow's charcoal mask did not leave my skin as dry and tight as Origin's charcoal mask.  Quite frankly, it is also downright mesmerizing, in a weird way, to see the dots of the Pore Matrix revealed on your face from GlamGlow's mask.  

Maybe with continued use, Origin's mask will de-clog all of my pores.  I'd caution those with dry skin to use this as it does have a drying effect on the skin.  I can't say that I'm impressed with this product, though.  Despite its hefty price tag, I'd still fork out the cash for GlamGlow's Super Mud.

Tuesday, September 10, 2013

Highlights from Europe: Brussels Edition

You can't go to Belgium without have their ever famous Belgian Waffle.  Move over Bruxie, this is the real deal!

The waffles were insanely delicious - just the right amount of sweetness delivered fresh, still piping hot!  Fruit garnish optional

You also can't come to Brussels without having Belgium chocolates

The famous Grand Place is the central square of Brussels.  Surrounded by guildhalls, the city's Town Hall, and the Breadhouse.  Pictured here is the Maison du Roi (King's House) or Broodhuis (Breadhouse)

This is the city's Town Hall

Guildhalls

Guildhalls

Friendly reminder...

The Atomium
This is an iconic building in Brussels built for Expo '58, the 1958 Brussels World Fair.

View from one of the top stainless steel spheres of the Atomium

Inside the Royal Museum of Armed Forces and Military History was this grand Aviation Hall.  This museum looks so tiny from the outside but inside was a fantastic display of exhibits originally collected by an officer, Louis Leconte.  This museum definitely doesn't get as much credit as it should.

"Mussels in Brussels" completed the Brussels leg of our European trip.

Keep following me as I take you to the great City of Lights, Paris, next...

Saturday, September 7, 2013

Sneak Peaks: September 2013 Ipsy Bag

The first half of every month is a much suspenseful time for Ipsy Glambag subbies!  Ipsy slowly releases sneak peaks and keeps subbies guessing as to what will arrive at their doorsteps.
Click HERE to start your Ipsy subscription!

Let's see what are the sneak peaks given are so far (source of all images: Ipsy)

Sneak Peak #1
That packaging and shadow design equates to NYX single eyeshadow.  Judging from the color, aside its use as an eyeshadow lid color, this can be potentially used as an inner tear duct highlight as well as brow bone highlight.
Health fanatics: this product contains talc and a paraben

Sneak Peak #2
Consensus guess: It's So Big Volumizing Mascara by Elizabeth Mott
For the health conscious, this mascara contains parabens

Sneak Peak #3:
Guesses: Jesse's Girl Waterproof Liquid Eyeliner
Cailyn Tinted Lip Balm
John Freida hair product 
Pop Lip Crayon
J Cat's Lipstick
Freeman Beauty Paper Masks


For the health conscious:
Jesse's Girl Waterproof Liquid Eyeliner contains a paraben
Cailyn Tinted Lip Balm contains mineral oil
John Freida's Shampoo contains SLS
Pop Lip Crayon contains mineral oil
J Cat's Lipstick contains mineral oil
I don't see parabens or mineral oil in Freeman Beauty Paper Masks

Ipsy revealed the design of the makeup bag that all of these products will be coming in on their home page:


Stay tuned for more sneak peaks as Ipsy provides them!

Wednesday, September 4, 2013

Highlights from Europe: London Edition

Happy September 1st, my lovelies!

So I've been remiss about posting photos of my holiday from this summer.  If you follow my blog and or Facebook page, you'll know I went on holiday this past summer to Europe: London, Brussels, and Paris.  I've always dreamed about visiting London and Paris since I was a little girl.  The culture, the history, the fashion, the iconic landmarks - all so very romantic for an impressionable little girl.  This past summer I fulfilled one of my biggest dreams and checked off another item on my bucket list when I landed at Heathrow Airport.

Trafalgar Square
That's Nelson's Column
This commemorates the Battle of Trafalgar (1805)

The National Gallery Museum, the fifth most visited art museum in the world

Buckingham Palace

The Changing of the Guards Ceremony at Buckingham Palace

The Royal Guards played popular songs originating from the UK such as the theme song from Austin Powers, Adele's Set Fire to the Rain, and Adele's Skyfall.

Recognize that balcony?  It's where the Duke and Duchess of Cambridge shared their famous kiss after marrying at Westminster Abbey.


Afternoon Tea at the Wolseley at Piccadilly Circus
Love the 1920s decor

Earl Grey tea in the UK is remarkably different (and better!) than any Earl Grey tea I've had in the United States.  In fact, I was never a tea drinker until I experienced afternoon tea in London.

Speaking of tea, we also visited the renowned Fortnum and Tea.  I loved looking at all of the gorgeous displays.  2013 is the Queen's 60th Coronation Anniversary.  Fortnum made a number of items to honor the Queen.

You can't come to London without shopping here.

The Victoria Memorial, a sculpture dedicated to Queen Victoria
This is right across from the gates of Buckingham Palace

Where the Prime Minister is - Downing Street
  
Hello Big Ben.  The bell is actually what's named Big Ben, not the clock

Westminster Abbey

Took a day trip out to Leavesden to tour the Harry Potter Studio!  Believe me, it was a great tour!

The Great Hall

Diagon Alley

Hogwarts

Took another day trip out to Bath.  Visited the Roman Baths.  The City of Bath is very similar to Firenze (Florence, Italy)

See the bridge in the distance?  Bath's own Ponte Vecchio (THE Ponte Vecchio is in Florence, Italy)

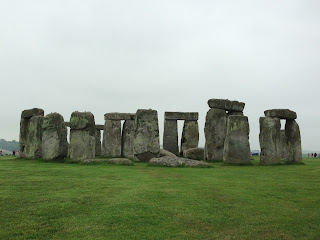
One of the 7 Wonders of the World: Stonehenge.  Took a day trip out to see this and can mark this off of my bucket list


Overall, I very much enjoyed my time in London and plan on going back as there are lots more that we weren't able to see due to time constraints.  Hope you all enjoyed this post giving highlights of the London leg of my trip.  For all of you foodies out there, click HERE to read about my dining experience at Gordon Ramsay's Petrus restaurant.  Thereafter, click HERE to read bout my dining experience at the Ebury Wine Bar in the Belgravia neighborhood.

Keep following me as I take you to Brussels next...

Monday, September 2, 2013

Tutorial: Smokey Cat Eyes


It's no secret that the culinary talent over at Insatiably Epicurious is a personal friend of mine.  We both were blogging when Xanga was the in thing (how many here use to blog on Xanga??) and eventually, through another Xangan, we eventually met.  It's funny how social networks breed and foster friendships.  Ours was solidified by our love for food.  If it wasn't for her, I wouldn't be back in the blogging world.  Check out her page for some delicious and home cook friendly recipes!

Anyway, she asked me about a makeup look I recently wore and posted on Instagram.  (If you haven't yet, you should follow me on Instagram: VinMaquillage.  I'm just sayin'!)  I wore this look recently when I got ready for BeautyCon, and I got a lot of questions about it.  The look is a lot easier to achieve than you think.  Since Insatiably Epicurious asked for my help to achieve this makeup look, I was forced to film a tutorial for the very first time.  The result?  Stressful but fun.  Who knows? I may even continue filming more!

Disclaimer: I am technologically challenged.  It took me FOREVER (ok, a day) to figure out how to edit the video using the iMovie app on my MacBook Air.  Unfortunately, I filmed using my MacBook and the audio did not sync up with the video - there's at least a 5 second lag.  (Apparently, this is common for all Apple users who upgraded to iMovie 11.)  As a result, I had to turn this into a sort of demo video.  Fortunately for me, I have a fantastic friend who is extremely knowledgable with videography since he works in the industry.  When I get a crash course from him, I will re-film this tutorial with a voice over tutorial.  Promise.  In the mean time, I hope you enjoy my rudimentary attempt at a tutorial.